Game Development and Media Reviews

Category: Game Development

The Evolution of the RTS Genre

Real-time strategy games used to be a popular genre within the video game industry but somehow faded into the background. Let’s talk about the milestones of the genre and figure out what happened.

Dune II is considered to be the grandfather of all real-time strategy games. It was developed by Westwood Studios and released in 1992. However its predecessor Dune was developed by a different studio and actually more of an adventure game that had strategic elements in it. The Dune games were based on the novels of Frank Herbert and followed a few years after the release of its movie adaptation by David Lynch in 1984.

1992- Dune by Cryo Interactive

Dune II was not the first real-time strategy title but introduced video game enthusiasts around the world to the nowadays fundamental concepts of the genre. The game allowed the player to issue orders using the mouse. It featured a basic base building mechanic that enabled players to unlock and train units. These units and buildings were bought with credits that could be acquired by gathering a resource called Spice on the map. Spice was collected with a non-military unit called Harvester. The player had to explore the map as the level was initially covered by a simple fog of war mechanic. The individual missions were connected by a strategic map which represented the overall progress of the game. This unique combination of features defined the look and feel of the RTS genre for decades to come. Dune II was commercially successful and sold over 250,000 units by 1996.

1992 – Dune 2 by Westwood Studios

The success of Dune 2 inspired competitors like Blizzard to develop their own RTS games. Warcraft: Orcs & Humans was released in 1994. The game expanded the role of non-military units as the player generally required more of them to gather two different types of resources and to construct buildings. One of those buildings was a farm that was necessary to increase the population limit to build up an army. This tied the strength of a players army to the general size of the corresponding base. The game also introduced a random map generator that was utilized for matches against the AI or against another player. The game went on to sell 300,000 copies.

1994 – Warcraft: Orcs & Humans by Blizzard Entertainment

The success of Dune II also enabled Westwood Studios to create Command and Conquer in 1995. The game relied heavily on the technical foundation that was created during the development of Dune II but was not tied to any existing IP. The game introduced cutscenes that featured real actors and the possibility to play online matches with up to 4 players. The game exploded in popularity and sold over 3 million copies. The franchise sold over 30 million copies by 2009.

1995 – Command & Conquer by Westwood Studios

The commercial success of Warcraft led to the to the development of Warcraft 2 in 1995. The game introduced an improved fog of war mechanic that hid enemy units in previously explored areas if no allied unit was in range. A third resource was introduced and water and air units were added to the game. Warcraft 2 sold over 3 million units.

1995 – Warcraft 2 by Blizzard Entertainment

StarCraft was released in 1998 and became the best-selling PC game of the year and an an eSports phenomenon in South Korea. The game and its expansion sold over 10 million copies. This track record established Blizzard firmly in the strategy market and paved the road for the most influential title in RTS history.

1998 – StarCraft by Blizzard Entertainment

Warcraft 3 was released by Blizzard in 2002. The game introduced RPG-Style hero units to the genre. These heroes were powerful units on the battlefield that earned XP, had an inventory, leveled-up and were able to unlock powerful abilities. Additionally, the game included neutral units on the map that dropped gold when they were killed. The game also included a map editor that enabled the community to create new game modes which heavily relied on those features and ended up influencing the game development industry in the decade to come. Warcraft 3 and its expansion sold over 6 million copies.

2002 – Warcraft 3: Reign of Chaos by Blizzard Entertainment

Multiplayer matches within the RTS genre tend to be very stressful as they are typically very reliant on the players ability to multitask. The community started to develop custom game modes that reduced the games complexity by focusing on specific aspects. These new game modes appealed to a more casual audience. Tower defense games automated unit control and let the player exclusively focus on base building. These custom maps started a popular trend of dedicated tower defense games in the late 2000’s. The game mode Defense of the Ancients focused entirely on hero units and birthed the multiplayer battle arena genre. This genre includes League of Legends with over 100 million players alone, DOTA 2 and Heroes of the Storm.

The popularity of the heroes in Warcraft 3 also led to the development of World of Warcraft, the most popular MMORPG ever created. The game had over 12 million subscribers in 2010 attracted the attention of major IPs like The Lord of the Rings (2007), Star Trek (2010), Star Wars (2011) to cash in on the hype.

In the years after StarCraft the popularity of RTS games seemed to steadily decline. The major franchises like Command and Conquer and Age of Empires saw diminishing returns as the cost of making state of the art games rose while the player base stagnated. The template that was created by Dune II was designed for keyboard and mouse input and did not translate very well onto other platforms. The market for RTS games eventually reached its limits while more approachable titles with streamlined mechanics found bigger audiences on multiple platforms. The RTS market didn’t vanish – it just stopped growing while other genres exploded in popularity. Sales numbers of later games are hard to obtain as sales started to shift into to the digital space. The number of reviews on Steam might be used as a general indicator for popularity and sales though.
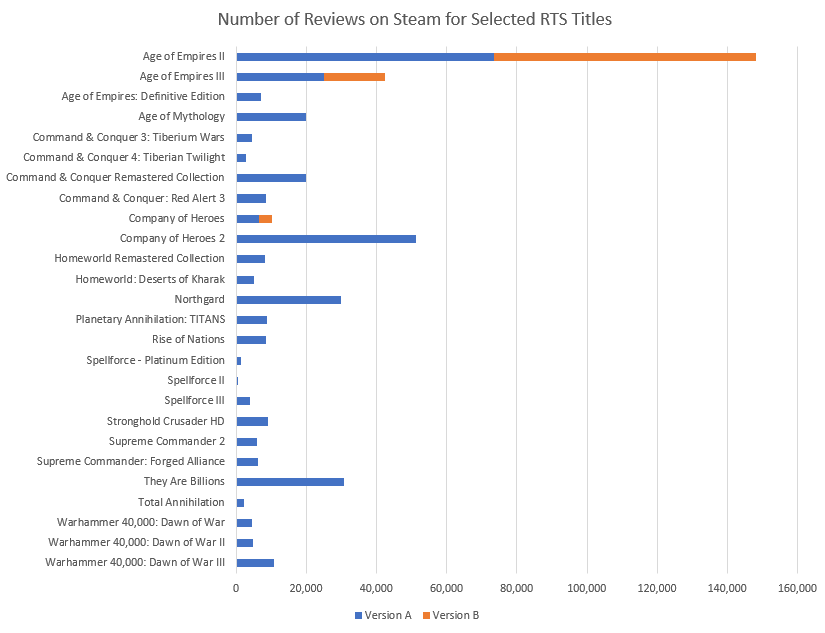
The data in this table is not perfectly comparable as some games have been released before Steam was available or are sold on other digital distribution platforms. Some titles have been sold in different versions on Steam.

The re-releases of older titles have a lot of reviews while newer games struggle. Age of Empires II was re-released twice in an HD and Definitive version with each iteration gathering a very significant audience. Assuming that 2% of customers review a product, Age of Empires II has been sold 7.5 million times on Steam. The usefulness of this data is somewhat validated by the ongoing development of Age of Empires IV and Company of Heroes 3.

Hope that helps.
Make Your First Game Asset

Have you ever wondered how to make a video game asset from start to finish? This tutorial covers the creation of fully destructible crates using only the freely available tools Blender, Krita, and Unreal Engine.

Step 1 – Make a Crate With Blender

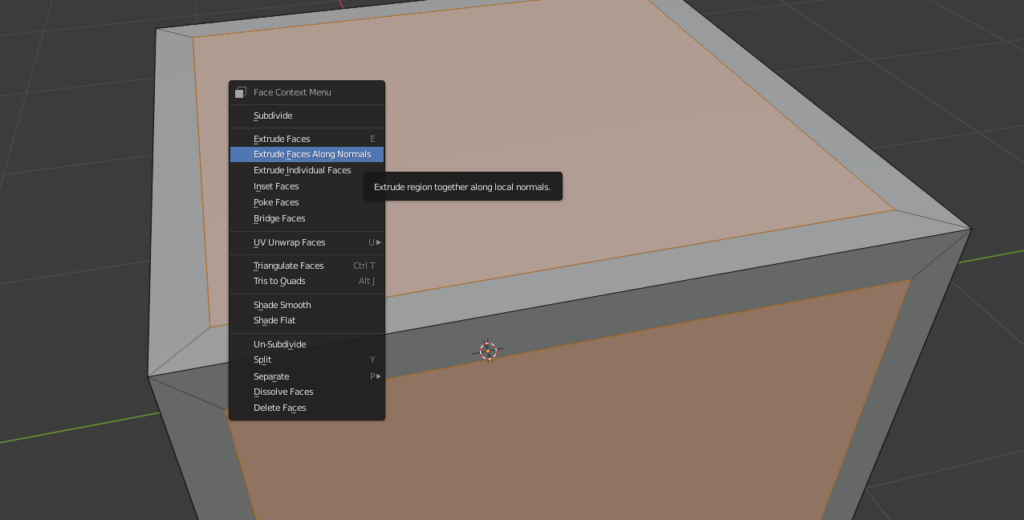
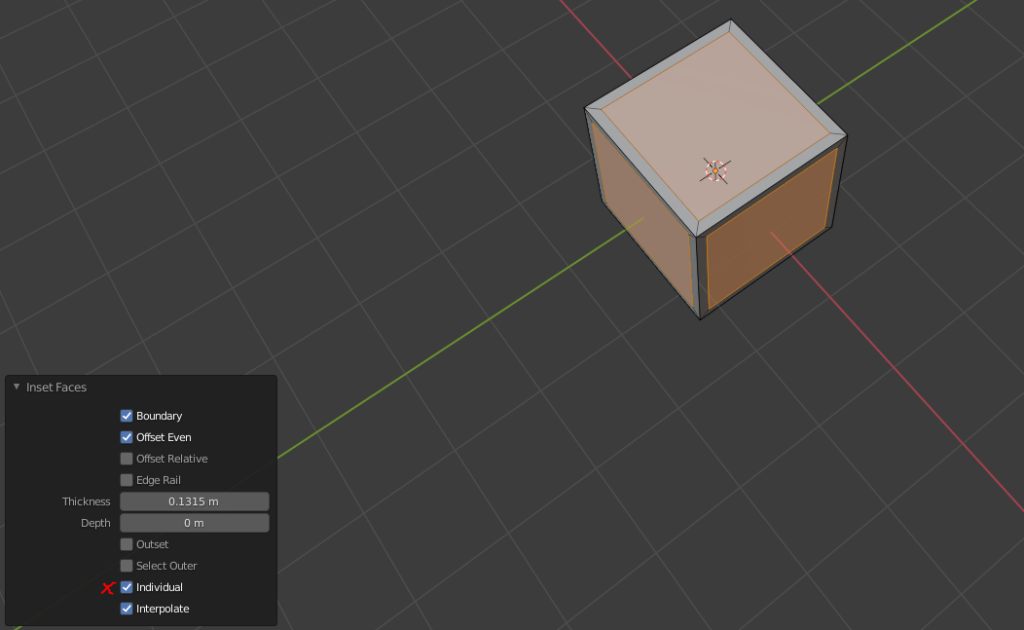
We start by creating the crate mesh in Blender. We do this by slightly insetting all 6 faces of a cube. The new faces in the center of each side have to be slightly extruded inwards after that.

When insetting faces, make sure select every face and to check Individual.
Open the context menu and select Extrude Faces Along Normals.

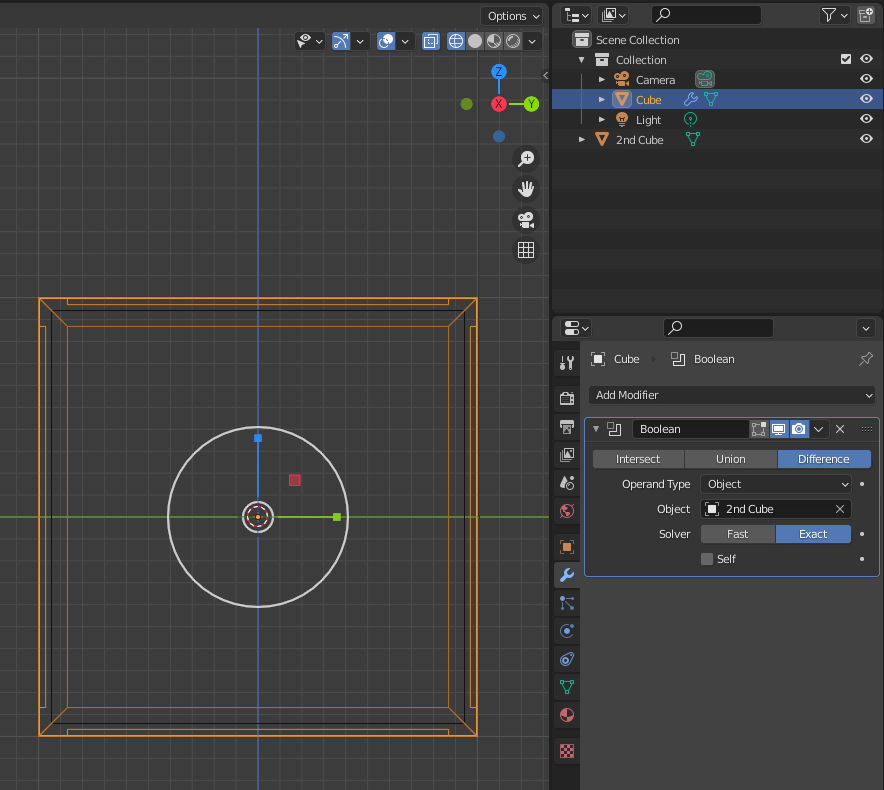
The crate has be hollow to support the destruction effects within Unreal Engine. Therefore we create a 2nd cube and move it inside our crate. The cube has to be scaled down to be slightly smaller than our crate. We can then use a Boolean modifier to remove the insides of the crate.

The size of the cube inside of the crate (black outline) determines the thickness of its wooden walls. Create a Boolean modifier and select the 2nd Cube as the Object. Apply the modifier to make the change to the crate permanent. Don’t forget to remove the 2nd cube before export.

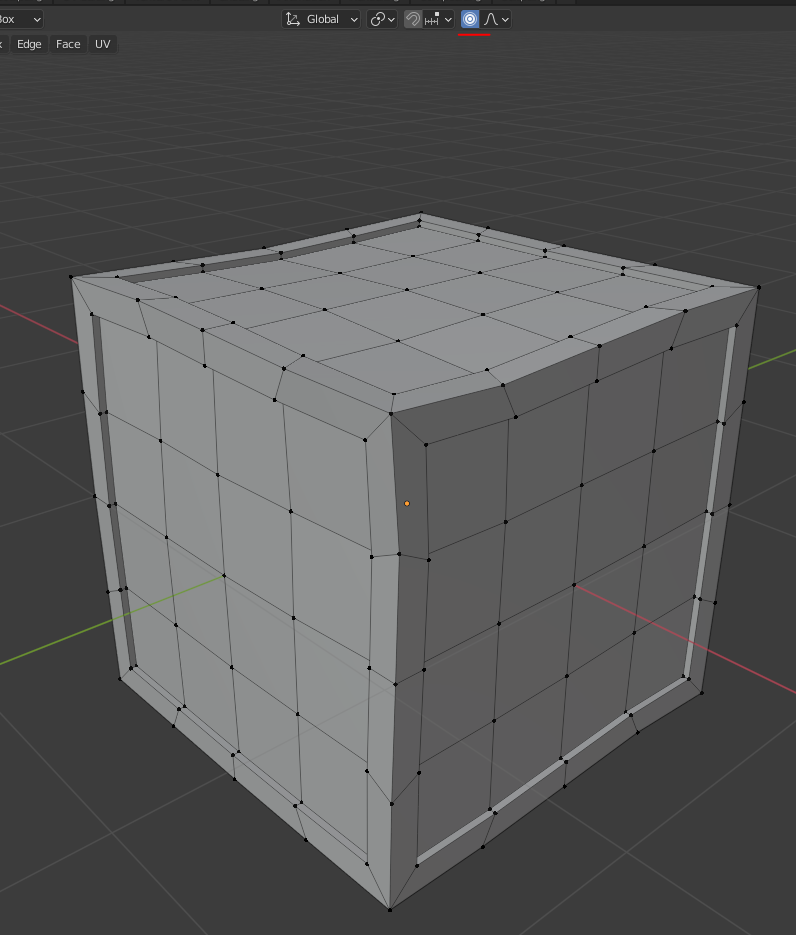
Uniform meshes can look pretty boring. I recommend you to add imperfections to the mesh by creating a couple of loop cuts and moving some vertices around using proportional editing. This gives the mesh a bit of character which works great in a low-poly environment.

Adding 3×3 loop cuts (CTRL + R) to the cube enables you to slightly deform the crate using Proportional Editing – the sphere of influence can be scaled by using the mouse wheel.

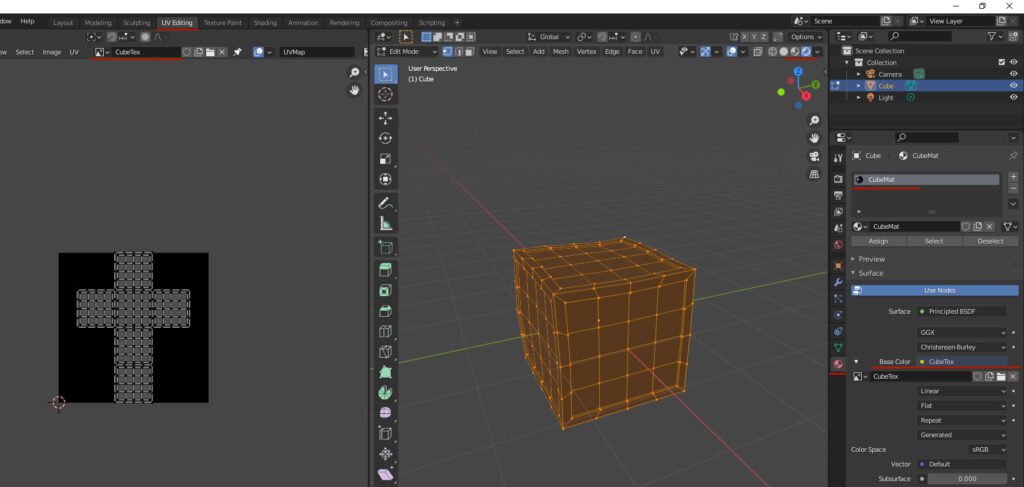
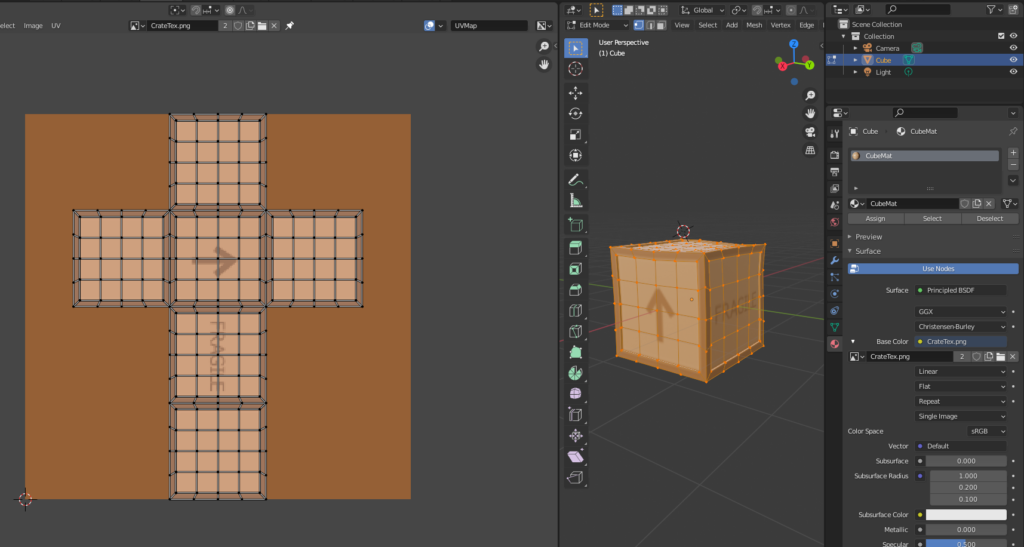
Open up the UV-Editing screen and add a new image with a size of 256×256. Save that image to a file called ‘CrateTex.png’. Select the entire mesh and export the UV-Layout to different file. Create and name a material. Assign it to your crate. Link the base color of the material as a image texture to the newly created image. If you switch the shading mode of your viewport to material preview, your box should appear all black – just like the created texture.

The UV-Layout can be exported under UV -> Export UV Layout.

Step 2 – Use Krita To Make a Texture

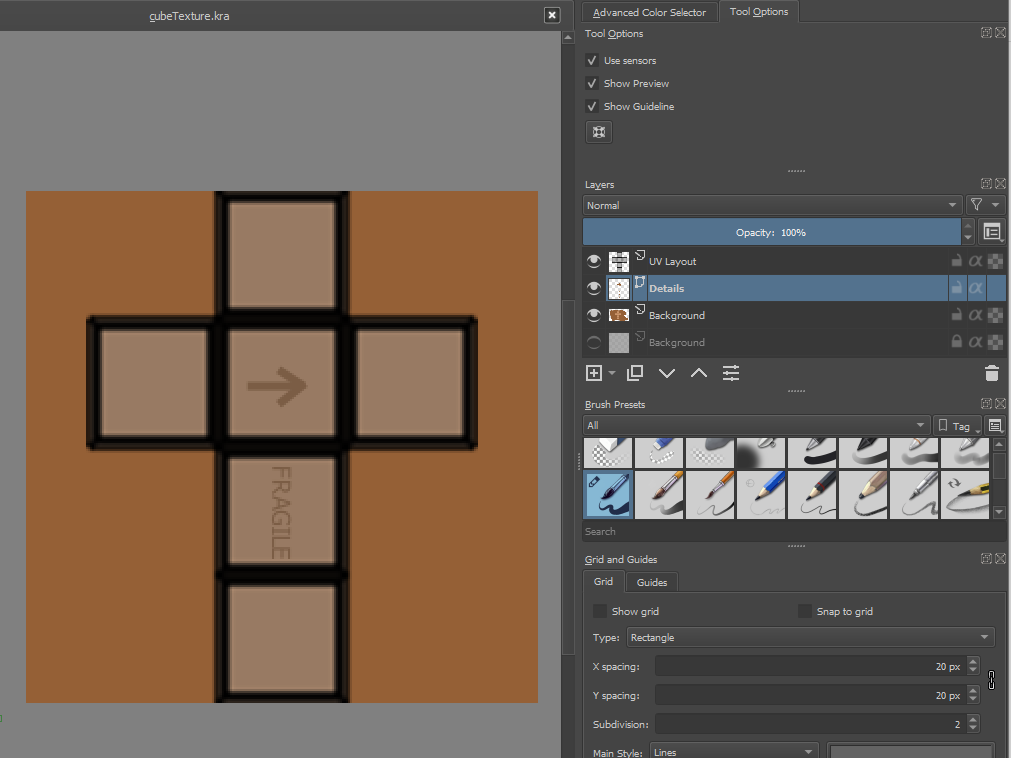
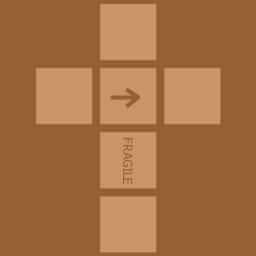
Import the UV-Layout into Krita with a canvas size of 256×256. Create a new layer beneath the UV-Layout and fill the background with a darker brown. Select the square areas in the center and paint them in a lighter tone. Feel free to add some details like a text saying ‘FRAGILE’ or paint an arrow pointing up.

Hide the UV-Layout layer before you export the result back into the texture file.
Reload your texture in Blender (Alt + R) and verify that everything looks correct.
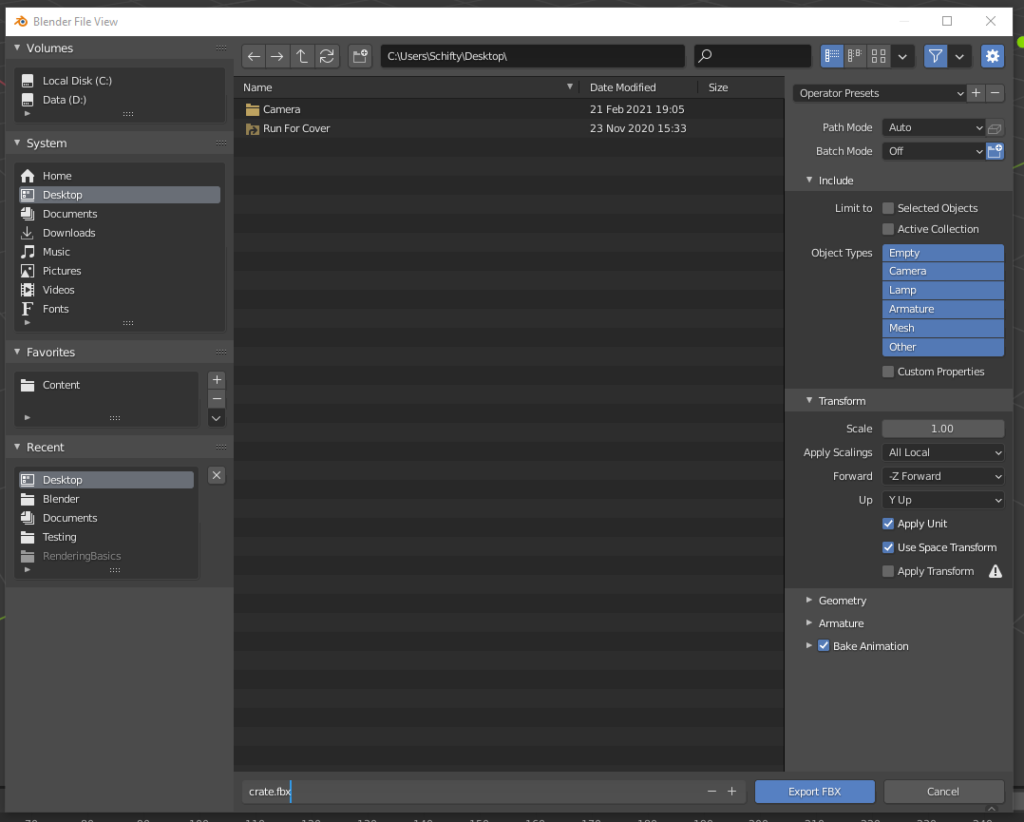
Export the crate into an FBX file.

Step 3 – Create a Destruction Effect In Unreal Editor

Create a new First-Person blueprint project in Unreal Editor. Import the created FBX and the texture by simply dragging the corresponding icons into the editor.

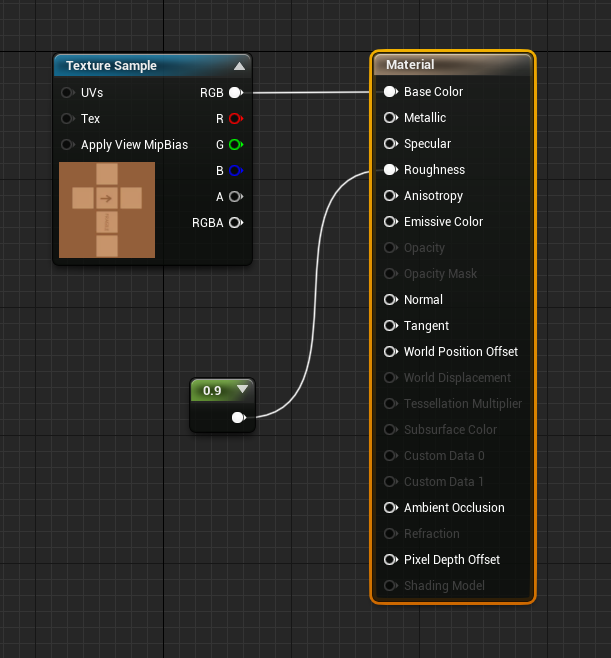
Edit the imported material and make sure that the texture is sampled. Set Roughness to 0.9.
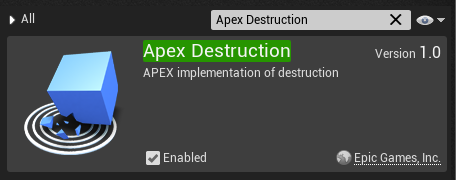
Go to the Plugins window and make sure ‘Apex Destruction’ is activated. Otherwise, the option to ‘Create Destructible Mesh’ will be missing.

Click on the imported static mesh and click on ‘Create Destructible Mesh’.

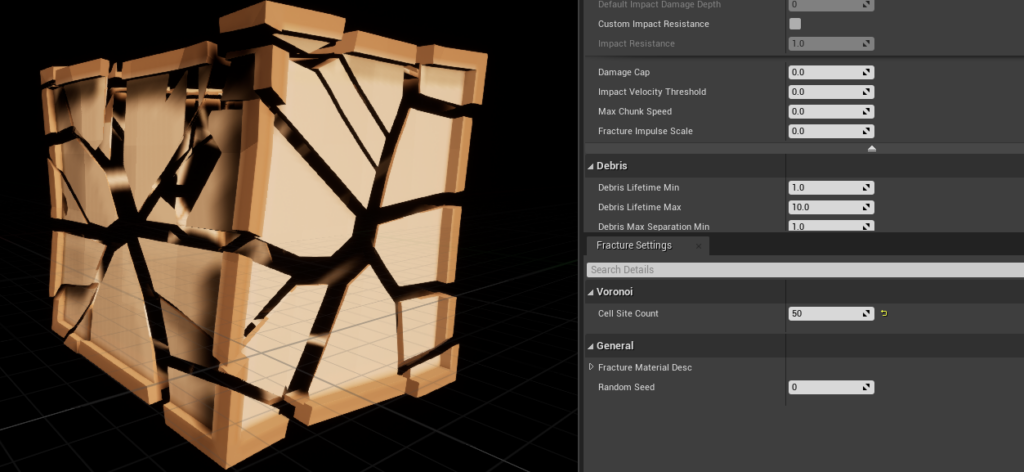
Open up the destructible mesh and play around with the ‘Cell Site Count’ to control the size of the resulting fragments. A higher number means smaller fragments.
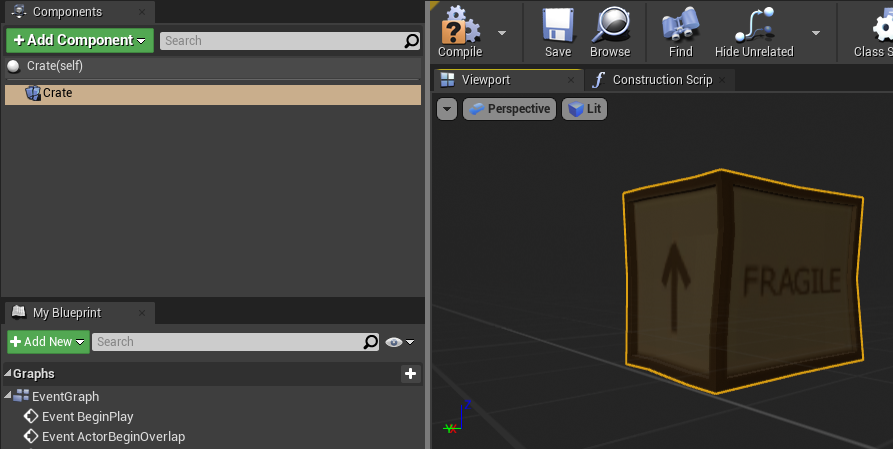
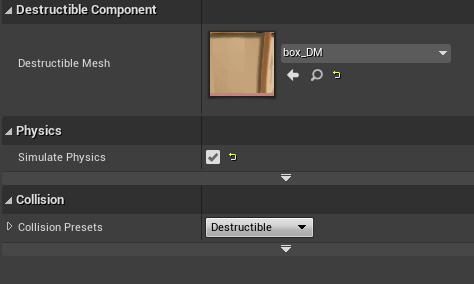
Create a new actor called ‘Crate’. Replace its root component with a destructible component.
Link the component to your destructible mesh. Check ‘Simulate Physics’ on the component.
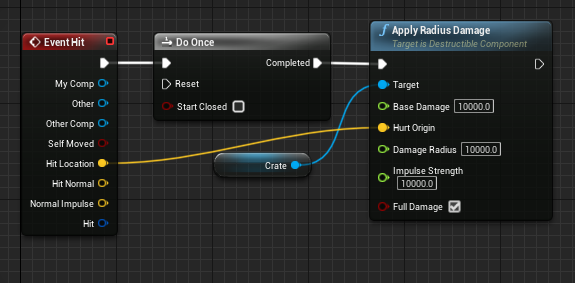
Make sure to apply radius damage to the mesh

Place the box in the level by dragging the actor into the viewport. Shoot at it.

Step 4 – Make It More Interesting

Hope that helps.

How To Get Started With Blender and Unreal Engine

Learning how to create simple models with Blender that you can actually use for game development might seem impossible to a lot of people, especially to programmers who don’t feel like they are artistically inclined. However, after +50h of practice, I found myself having the confidence to create simple game assets myself. Here is how I got started.

I stumbled upon a couple of very interesting Blender tutorials by Grant Abbitt on Youtube. He teaches very simple techniques for absolute beginners and his videos feel more or less like a mixture between painting tutorials a la Bob Ross and Lego instructions. These Beginner Exercises are very easy to follow but often ask you to try things out for yourself first before continuing with detailed commentary.

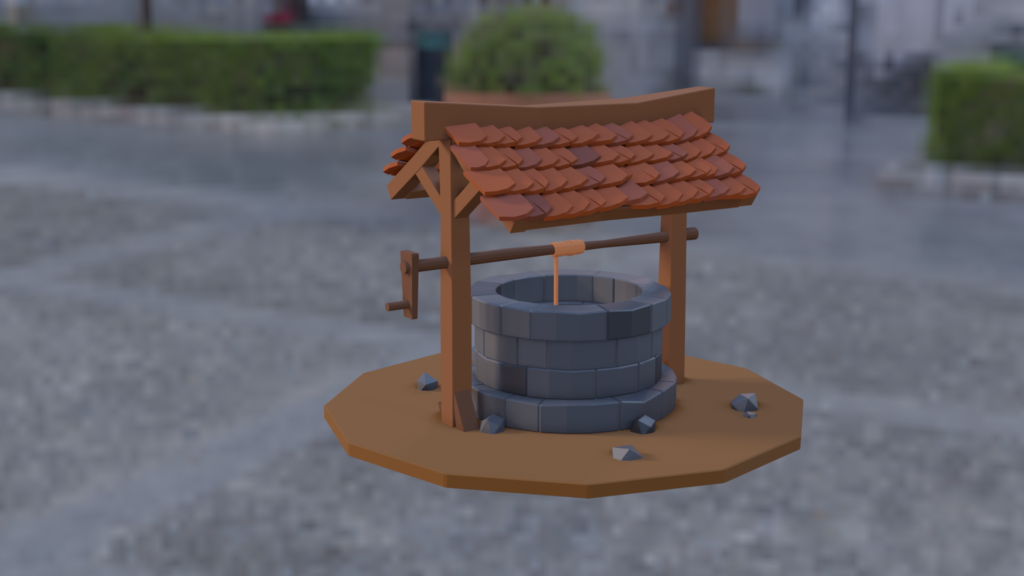
After finishing the first four beginner exercises, I started to look into creating an actually usable asset. This is when I jumped to the Low Poly Well Tutorial. This tutorial consists of three parts and yielded a very decent result. I especially liked how this tutorial challenged you to create some of the easier stuff yourself. This gets you into the right mindset by forcing you to think and plan ahead when modeling.

The well tutorial teaches you how to add different colors, bumps, and dents to your mesh in order to combat uniformity and to create a visually interesting result with a bit of character.

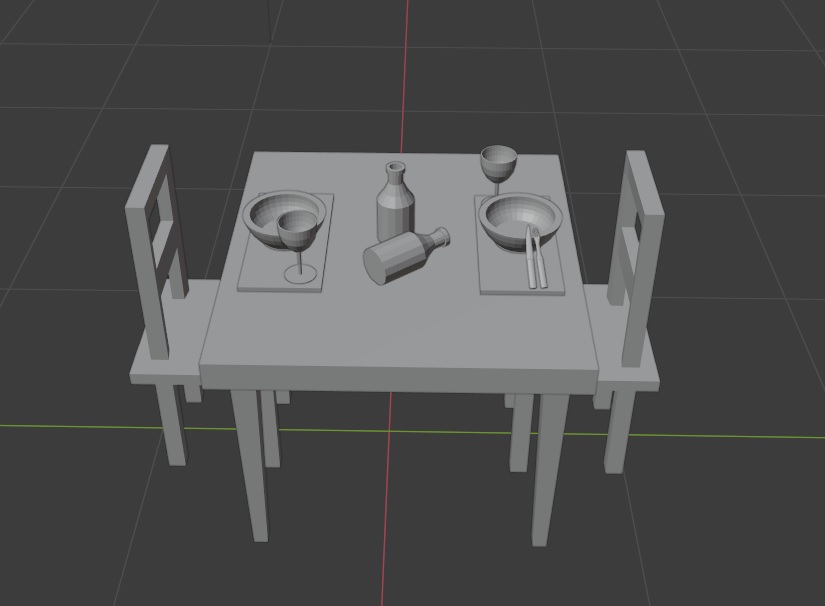
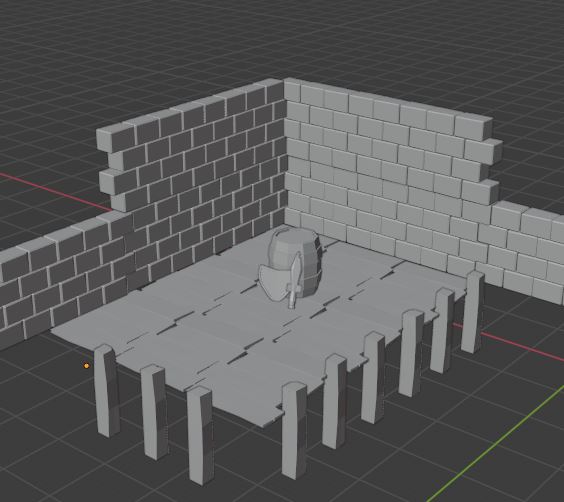
After finishing the well tutorial, I wanted to move on to something bigger – something that I could export to Unreal Engine, something I could animate and show off. I wanted to create a product that people would like and enjoy. The ideal guide to support that goal was the Sea Shack Tutorial. The tutorial consists of twelve parts but the actual geometry was modelled in the first six. The construction of the shack is briefly explained but you are left on your own after modeling the lower platform. The creation of twelve easy objects in the scene is skipped too. However, the shack and the other minor models should be pretty easy to recreate with the previous tutorials in mind.

The final result in Blender. I added a camera path with a little dip in the back to get the most out of the scene. There are some screen space reflection artifacts remaining that I was not able to fix.

Getting Your Assets Game Ready

In order to make the assets available in Unreal Editor I had to export the scene as an FBX file that can be easily imported. Joining all elements of the scene together enables you to easily transfer the whole scene layout as a single static mesh to Unreal Editor. Make sure to name all the materials you are using because those names are used to create material assets in Unreal Editor during import. Most material assets need at least a little tuning when it comes to shininess. Cloth materials require back-face culling to be deactivated as both sides of the mesh need to be rendered. The recreation of the water material needs most of your attention though.

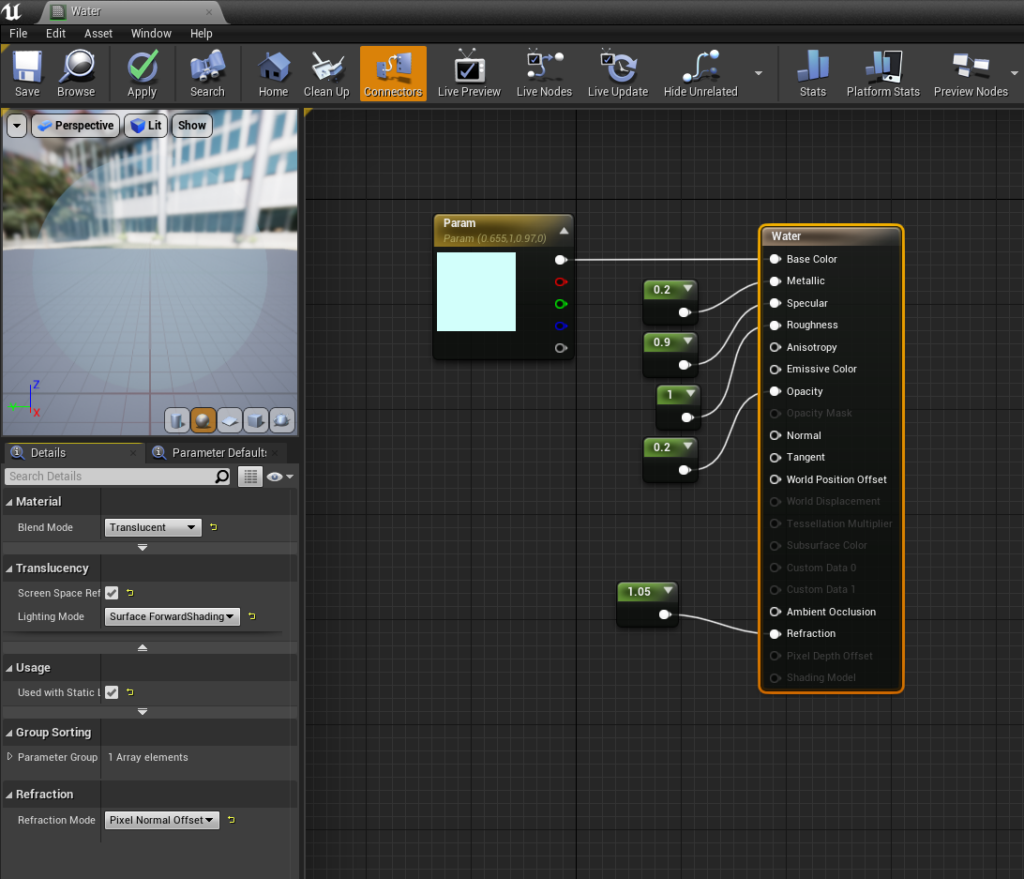
The most complicated material to recreate in Unreal Editor is the water material. Make sure to set the render mode to Translucent and activate the checkbox next to Screen Space Reflections.
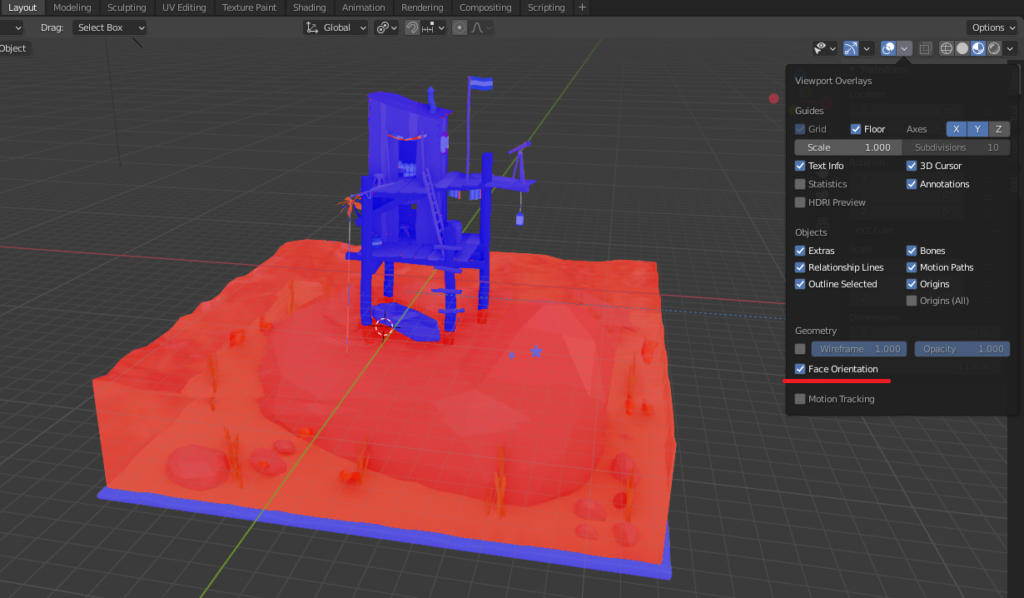
During the modeling process in Blender, some normals might have been flipped. Objects with flipped normals will not be rendered correctly due to back-face culling. You can check your normals by activating Face Orientation. Blue faces are rotated towards the camera and are fine while red faces are not. This can be fixed by pressing Alt + N -> Flip in Modeling mode.

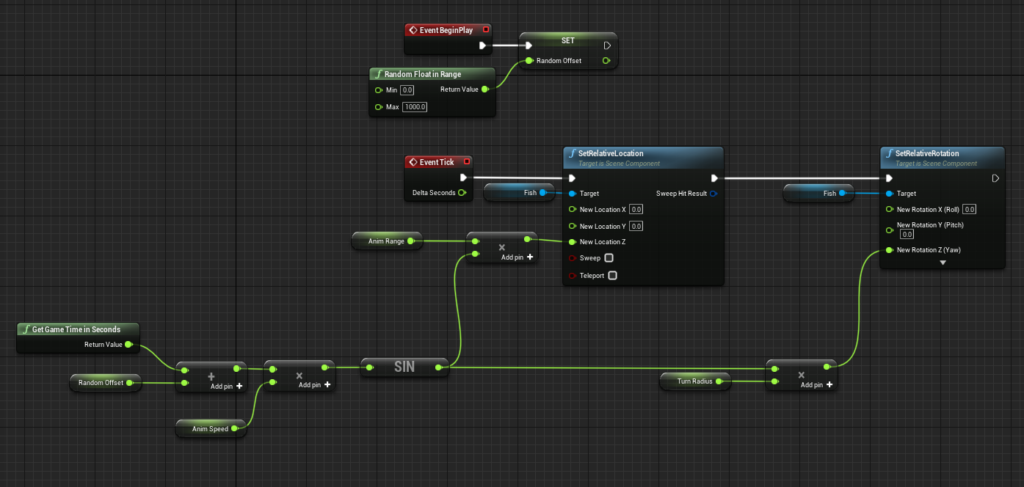
After the initial import of the scene with all components joined together I removed the fish meshes from the Blender scene and exported a single fish mesh separately. I wrapped the fish mesh in a fish actor that is animated via Blueprints. The fish actor was then placed, scaled and rotated multiple times to replace all previously existing meshes. You need to do this for every additional element like the seaweed or the flag that you want to see animated.

The animation blueprint for fish moves and rotates the mesh slightly back and forth. The random time offset is helpful to prevent a uniform animation look.
I presented the final result from Unreal Engine on reddit to figure out the market appeal and received over 600 upvotes. The negative comments focused on the chosen coloration.

While I’m personally really happy with the result I do think that the scene and I might benefit from additional optimization:

  • This little animation currently requires 30 single color materials. This number could be vastly reduced by mapping a texture onto the mesh.
  • The walls of the shack consist of multiple individual boards. The number of vertices could be reduced by using a single simplified mesh and a normal map.
  • Bones and Rigging could be utilized to improve the fish animation.

Hope that helps.
A Beginner’s Guide To Rendering

Understanding computer graphics is hard. It is even harder to figure out where to start. This guide aims to provide a top-level understanding of common terms and processes that make pictures happen. The examples are implemented using Blender and Unreal Editor and do not require any programming or art skills.

Vertices

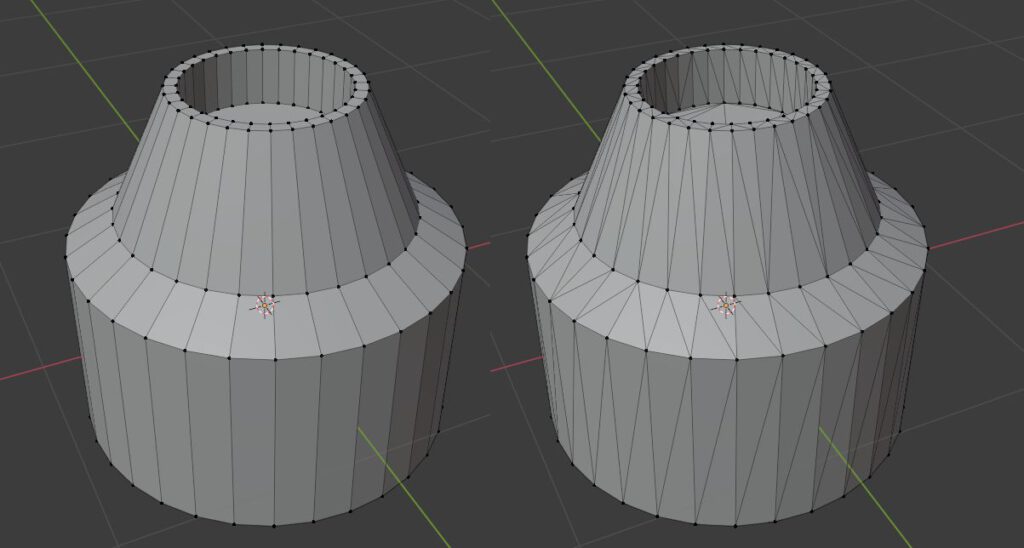
Vertices are an important building block of computer graphics. A vertex is a single point in a virtual space that can be implemented in multiple different ways. The most basic version of a vertex in a 3d space consists only of the values X, Y, Z that represent its position. Vertices are commonly used to define lists of triangles that represent a 3d mesh because triangles can be easily rendered by GPU programs called shader.

When working with 3d editing software like Blender you will be presented with quads instead of triangles as quads are easier to shape into complex models. The mesh will be automatically triangulated during export to be later used in your game engine.

Back-Face Culling

Triangles have a front-face and a back-face. Usually only triangles facing the player are rendered as this almost halves the number of triangles that have to be rendered on screen. This technique is called back-face culling and leverages the assumption that you shouldn’t be able to see the back-faces of solid 3D objects.

Back-face culling is off: The back-faces of this object are visible and take up valuable resources. This is typically unnecessary as most objects do not have holes in their mesh.
Back-face culling is on: The back-faces of this object are invisible and we render only the outside of the object as we assume that our objects typically don’t let us look inside of them.
The material settings of Unreal Editor allow you to deactivate back-face culling for each material.

UV-Mapping

The first common extension of vertices are a set of texture coordinates usually referred to as UV-coordinates and are used for a process that is called UV-mapping. The two values u and v are ranging from 0 to 1. They reference a point in the 2d space of an image with (0.5, 0.5) representing the center. If you create a triangle in 3d space with 3 distinct UV-coordinates you can visualize that triangle in the textures 2d space. The UV-coordinates for each rendered pixel of the triangle are interpolated and used to look up a specific pixel from a texture in a process called texture-sampling.

UV-coordinates are assigned to a mesh. A shader can use these coordinates to sample the texture.

Normal Maps

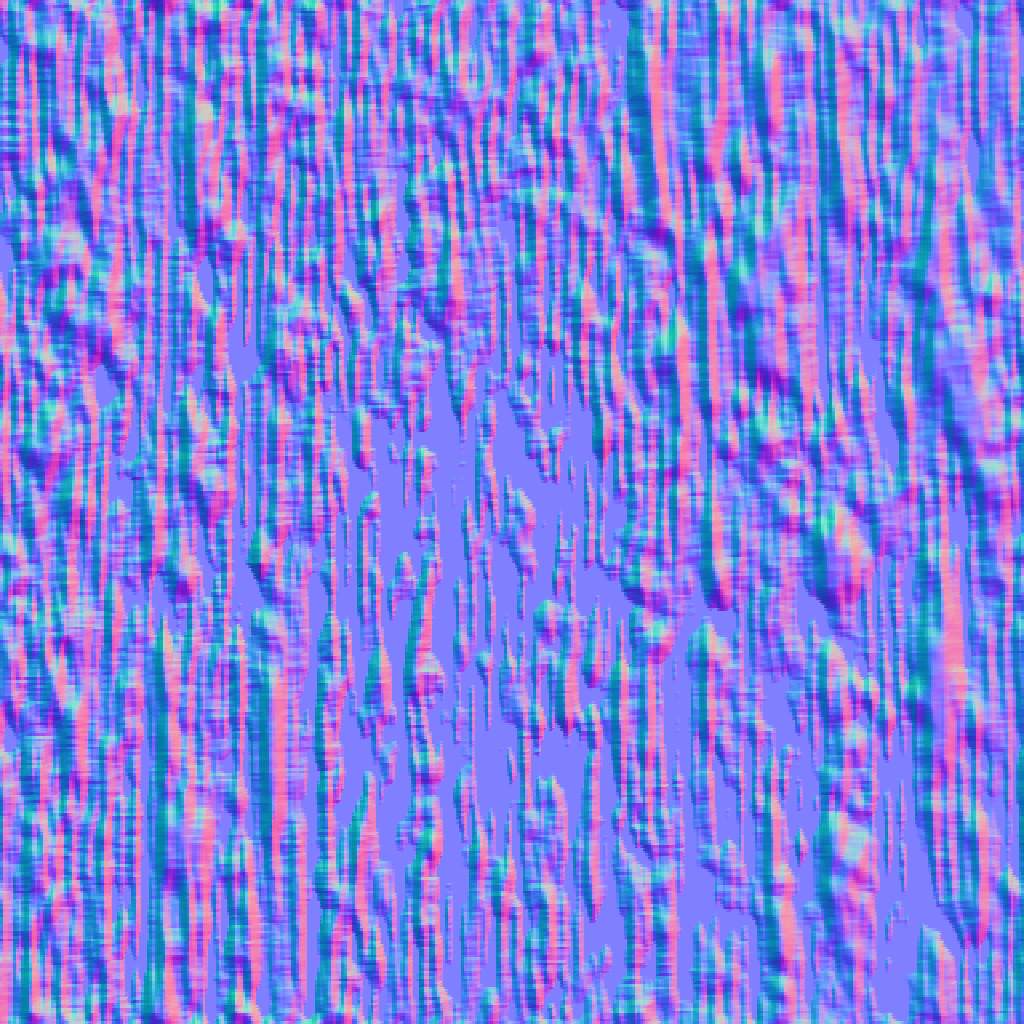
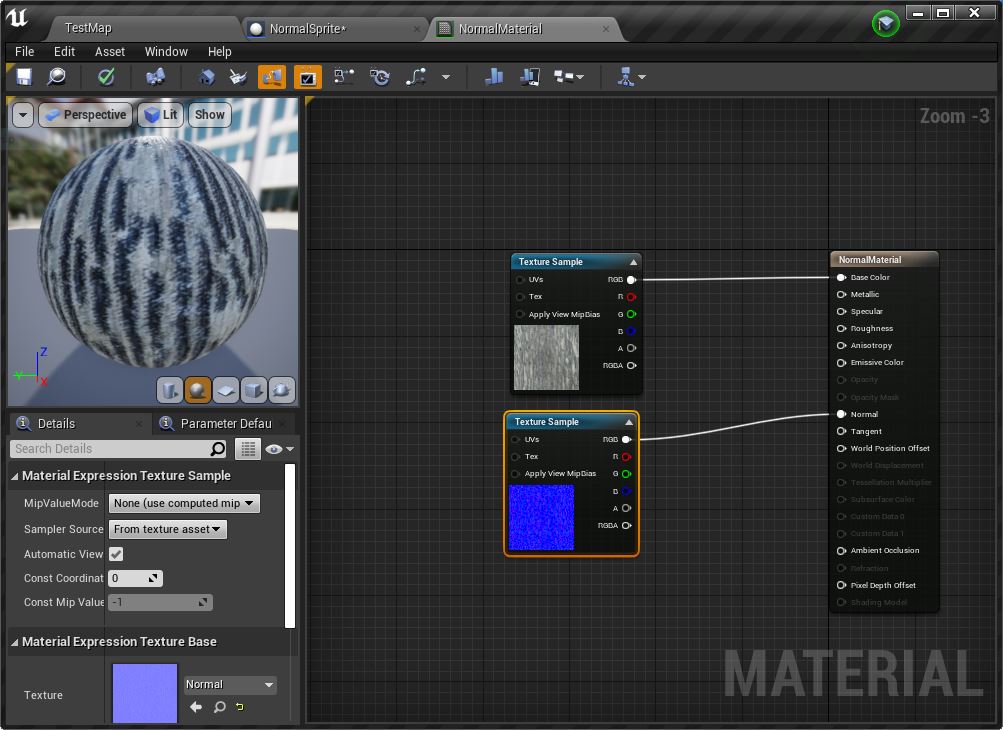
The combination of UV-mapping and texture-sampling can also be used to implement normal-maps to create more detailed models without using more vertices. Normal maps are used to ‘bend light with math’. This creates an illusion of bumps and dents that are missing from the mesh.

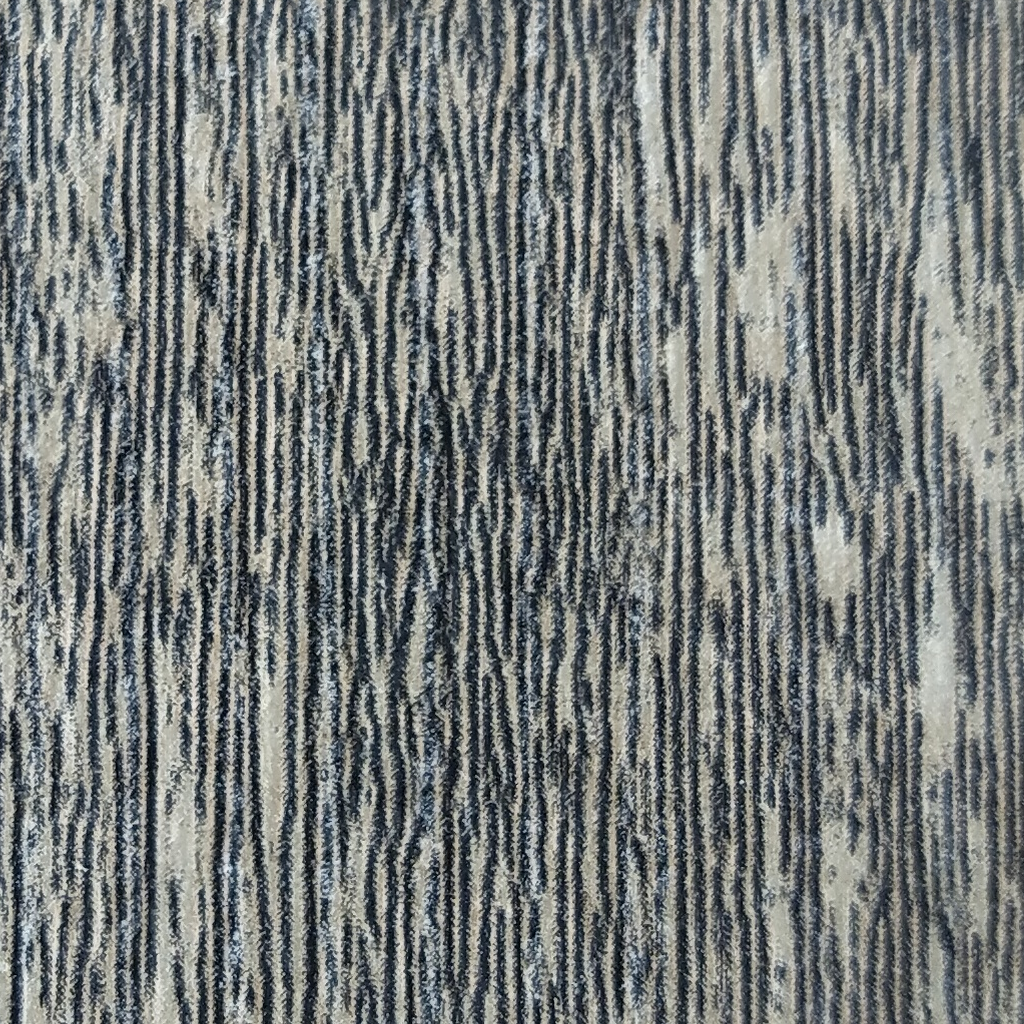
I created the texture by taking a picture of my coffee table and cropping it into square dimensions. The normal map was based on that texture and created with a process called baking normals using Blender. The added normal map creates the illusion of deep ridges that are not really there. Creating a mesh with that level of detail would require a lot more resources than just adding a normal map.

Texture Masks

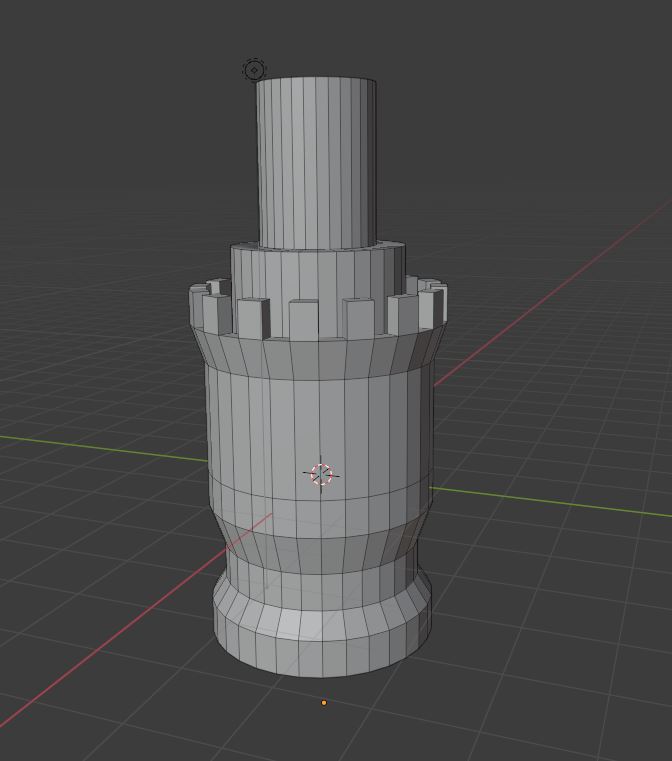
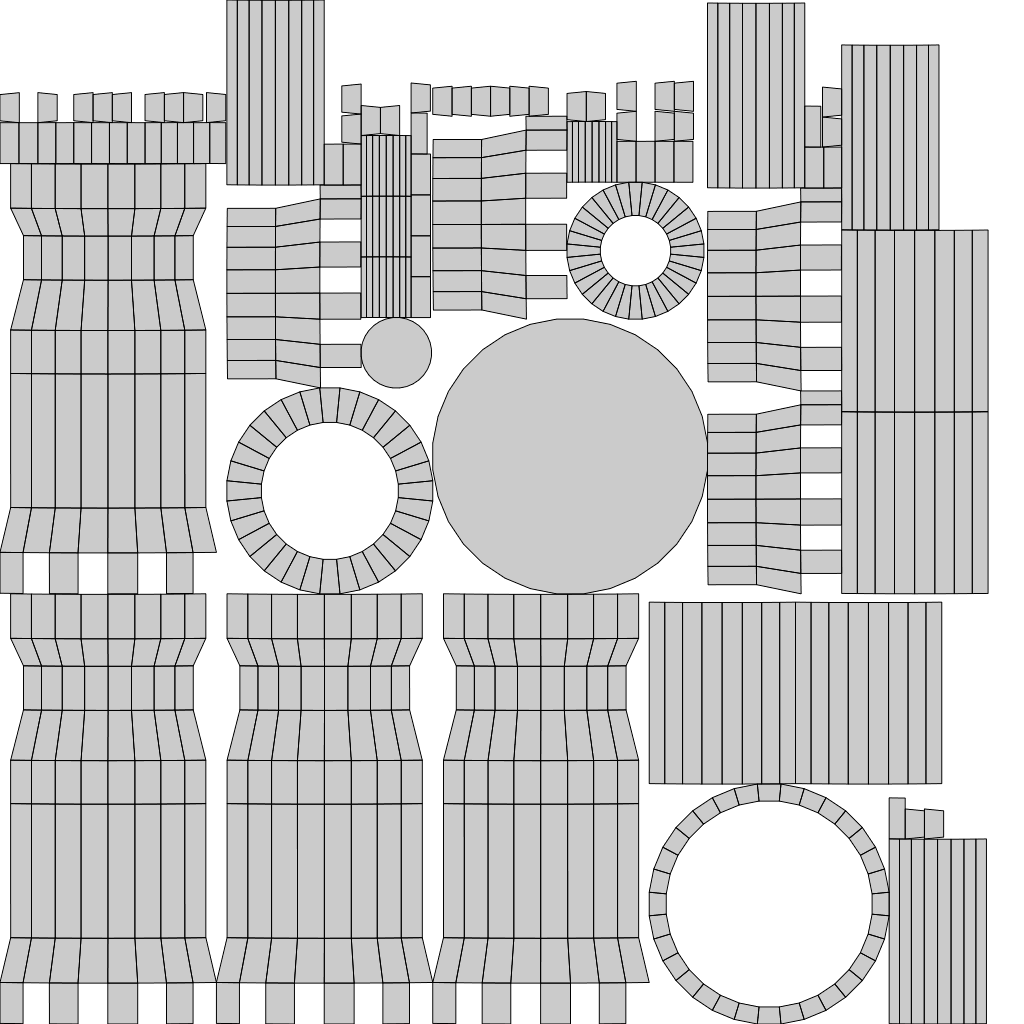
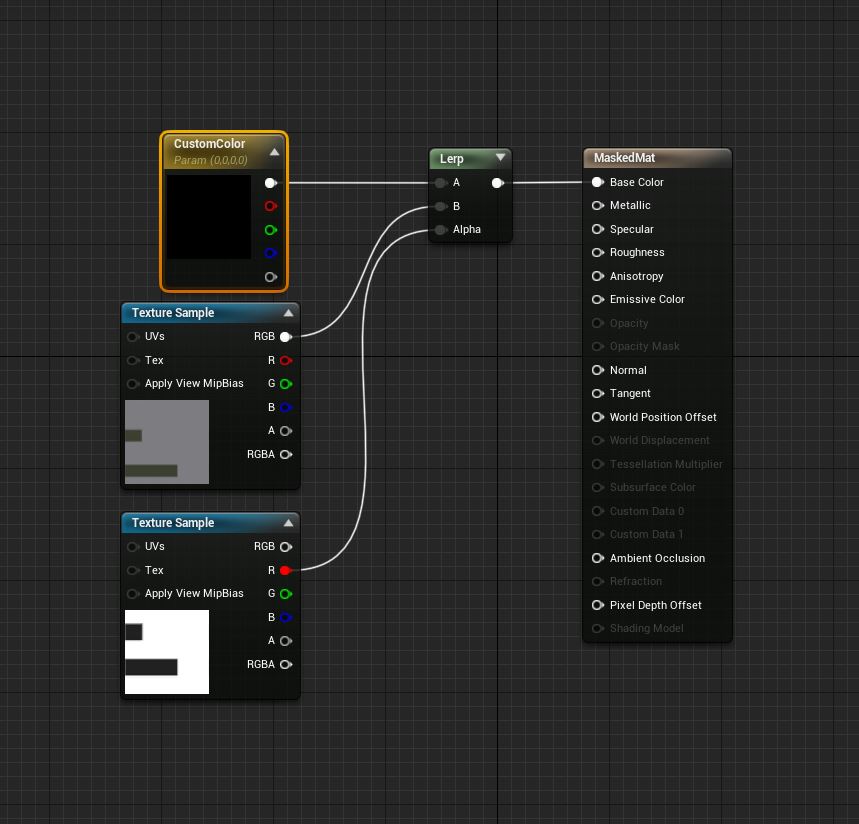
UV-Mapping can also be used to implement texture-masks to enable color customization. Masking a texture is similar to setting up the texture itself. You assign texture coordinates to the 3d model and paint the areas you want to mask. The mask acts as a switch between the texture and a dynamically specified color on each rendered pixel. A common RGBA texture mask comes with 4 switches that enable you to blend and combine a total of 5 textures.

The colors of the marked areas of the mesh can be adjusted easily while preserving the rest of the texture. Masking is commonly used in character customization or to color code team members.

Vertex Color

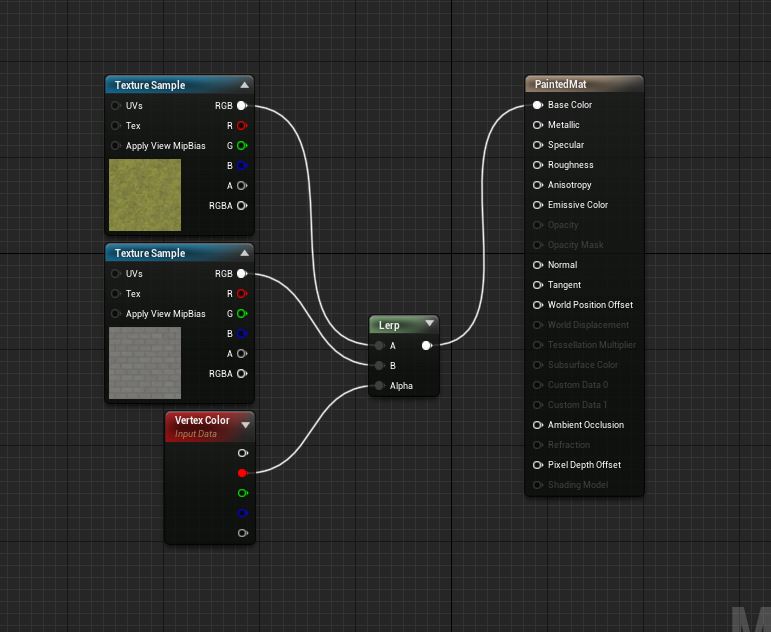
Another common extension of vertices is the addition of a vertex color. A vertex color is usually represented by 1-4 values but can be even higher depending on the use case. Vertex color is used to mix and blend textures on terrains or walls that would otherwise look very stale. This is achieved by associating each value of the vertex color with a different texture and by blending accordingly. This effect works better with models that have lot of vertices as vertex coloring with very simple meshes does not allow for enough details.

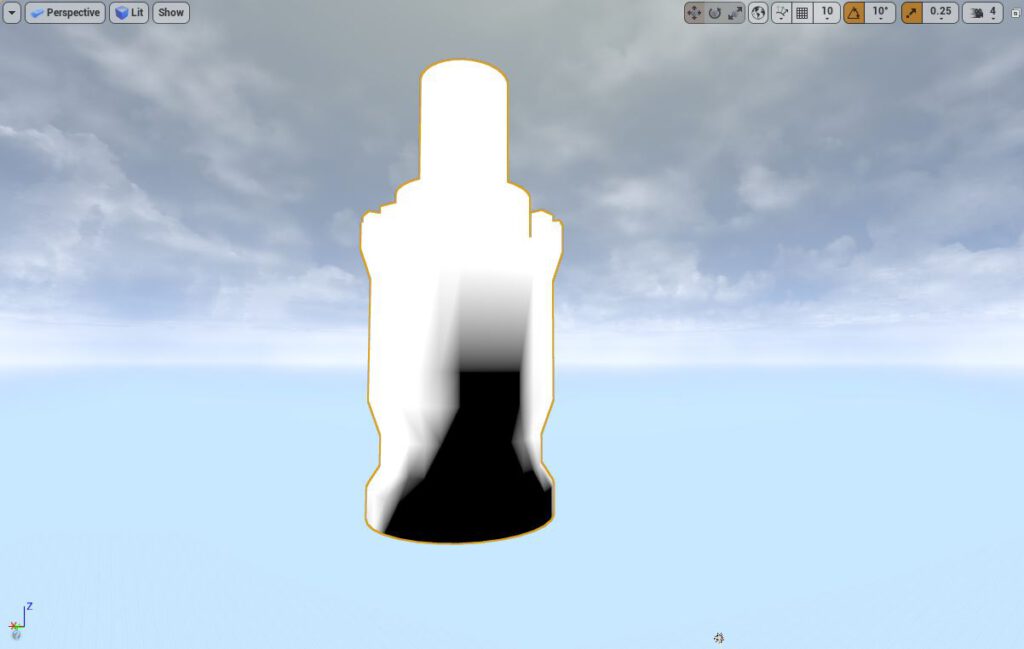
The vertex painting tool in Unreal Editor enables level designer to paint right on the mesh.
A Quick Comparison
Vertex ColoringTexture Masking
– no additional texture required
– quality depends on vertex density
– information stored in vertices
– designed to create endless variations
– used for level design
– information stored in texture
– independent of underlying mesh
– typically one mask per object
– designed for dynamic coloring
– used for gameplay features
Vertex Coloring and Texture Masking both implement texture blending but have different use cases.

This was just a quick peak into the world of rendering techniques. Let me know what you want to see next.

Hope that helps.
Politics in Video Games is Everywhere

Far Cry 5 surprised a lot of players by openly referencing modern politics.

The recent discussions about including politics in video games seem pretty dumb to me. When people complain about politics in video games, they usually complain about an attack on social norms. The conversation is mostly limited to inclusiveness and gender politics. It lacks the realization that there are political messages in every story and therefore every video game. Even the ones you would normally deem apolitical. This inclusion of politics might not even be intentional but there is usually no way around it. You either reinforce societal norms or you try to challenge them. Let me prove that to you.

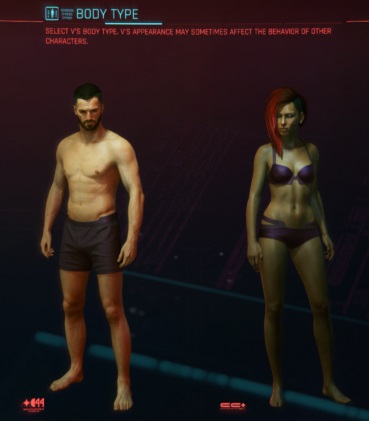
Games like Cyberpunk 2077 started to move away from traditional character creation by letting the player select a body type instead of a labeled gender.

Remember Star Wars from 1977? Star Wars is the story about a young man named Luke Skywalker joining the Jedi in fighting against the evil Empire to free the galaxy from oppression. It is not the story about a radicalized teenager turned terrorist who joined a cult and blew up a space station with tens of thousands of people inside. Why is that? It’s because George Lucas chose to make Luke his protagonist; he became the hero of the story and not its antagonist. Remember that the next time you are playing Call of Duty. People usually don’t recognize the choice of protagonist by a game developer to be a political decision as long as it doesn’t go against established norms. Your enemies are called terrorists and you have the duty to shoot them. Now think about the last time you fought off an evil invasion force from the west to protect your family? People would call that blatant political propaganda.

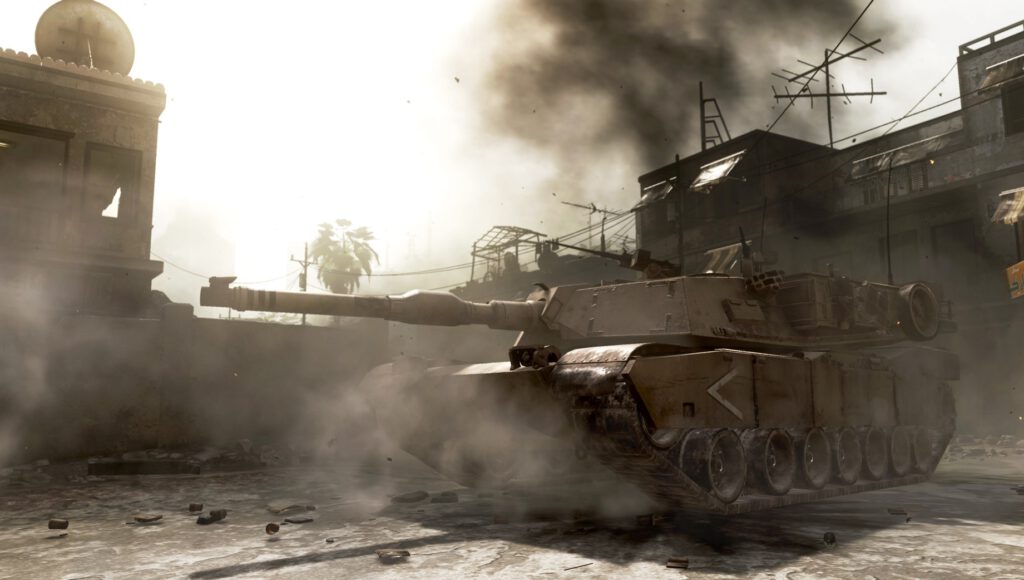
Call of Duty: Modern Warfare made it simple to understand who to root for. This was not deemed controversial by most as this game was published during the height of the War on Terror.

The science-fiction setting is usually pretty immune to feeling political as most contemporary context is removed. Ironically, most stories that are set in the future are in fact as political as they can possibly get because they have to predict the future of humanity. Finding the trajectory for humanity has to start with an analysis of the current political situation and its problems. Is humanity prospering without the need for money like it does in Star Trek or are mega-corporations taking over and making everybody miserable like they do in The Outer Worlds or Cyperpunk 2077? Those cases represent massive criticisms of capitalism. Have we learned to live together with aliens and embrace diversity like shown in Mass Effect? Or is humanity locked in a constant war for survival like it is in Halo? Curiously, the latter game is about a pure and homogenic group of warriors with blue eyes that kills diverse groups of aliens. These games touch on the subjects of strength through purity vs. strength through diversity – which sounds pretty political to me.

The Outer Worlds parodies the consequences of unchecked capitalism but its message was not seen as controversial as the context of todays political parties was completely removed.

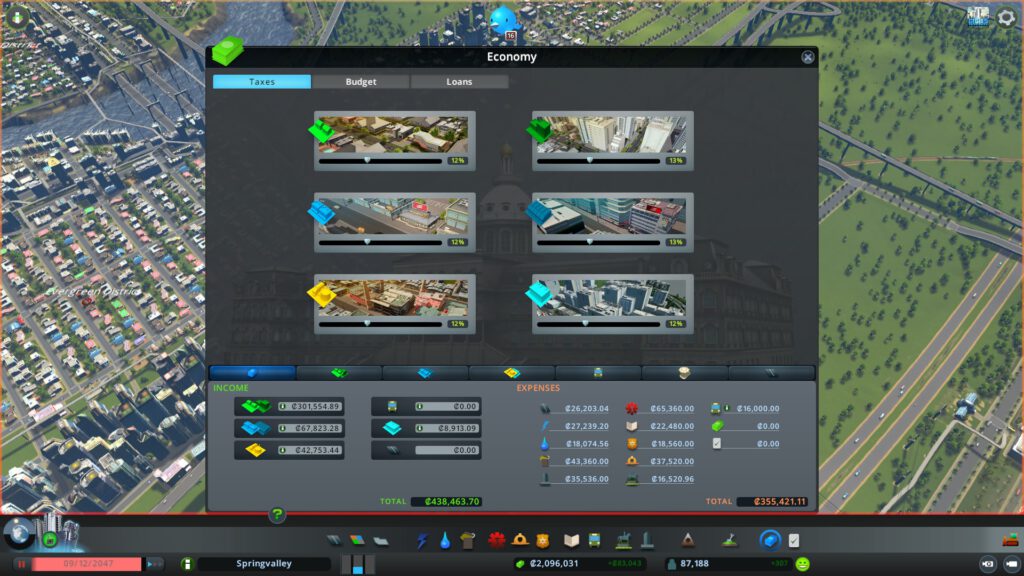
Let’s look at games like Cities: Skylines. This game is political and it doesn’t even have a story. As you build your dream city you eventually have to navigate your city’s budget. What is a fair amount of taxes? At what point are your citizens going to protest your government? How does lowering taxes impact growth? You can’t get around answering those questions without making a political statement, even if you really don’t want to.

You can adjust the tax rates of your city in Cities: Skylines with several sliders forcing the developer to set a ‘default tax rate’ associated with economic and political consequences when moving away from it.

Politics has always been in video games. When people say that they don’t like politics in video games, they usually just refer to an isolated statement that disagrees with established norms.

Hope that helps.
5 Books That Helped Me Become A Better Game Developer

As a game developer I was never much into books. I loved playing video games, binging shows and watching movies but I was always alien to the greater value of reading. I had to work through a couple of math books in college, loved Harry Potter and Game of Thrones but rarely picked up anything beyond that – and at some point in my professional life, I stopped reading books altogether. And then 2020 happened. With some time on my hands and the desire for self-improvement I stumbled upon this statement:

If you don’t read, it’s like you can’t read at all. There is no difference.

These words resonated very strongly with me. I started to wonder about all the missed opportunities for self-improvement and all the valuable insights I lacked. Independent video game development is much more than knowing how to create art, code or design – it’s also about understanding goals, noise, and habits. I started to have this massive surge of FOMO about broadening my perspective that pushed me right into compiling and working through my first reading list. These five books are not specific game development but they really helped me to find focus in life and therefore become a better game developer.

7 Habits of Highly Effective People by Stephen R. Covey was actually on a recommended reading list for my computer science degree in college. It’s a classic that introduced the concepts of proactivity and synergy to a broader audience. It took me around 10 years to finally read that book and I am quite saddened to have waited that long. The first part of the book focuses on personal growth. The author explains to you how to identify what is important to you and how to get there. The second part teaches you how to engage in meaningful relationships. This book profoundly shifted the way I perceived my work and the interactions I have with others. I realized that making video games should have more priority in my life – waiting for the perfect moment to focus all my energy to advance my life’s agenda doesn’t cut it anymore. I recently reduced the hours of my current day job significantly and started to reach out to publishers and other independent game developers in hopes to someday be a part of something great. ‘Your project looks fantastic! How can I help?’

Atomic Habits by James Clear is a book about the power of habits. It focuses on how to develop and maintain good habits while also explaining how to get rid of the bad ones. I started to compile a weekly habit tracker to make sure that I work out, clean my apartment, study Russian, and wake up and go to bed on time. So far I’m almost half a year into this fixed daily routine. If you can figure out how to manage your life outside of game development, you have a better chance of focusing on it

Make Time by Jake Knapp taught me about the dangers of smart phones. I used to waste a lot of time on my phone scrolling through Reddit or watching YouTube videos. Don’t get me wrong – it’s absolutely fine to watch videos or read articles you are actually interested in. I use the word ‘waste’ here because I remember distinctively how I wasn’t even enjoying much of that time. To stop this, I removed all games and social media apps from my phone. I blocked websites like Reddit and Facebook and put restricting timers on apps like YouTube and my browser. I deactivated all notifications and put my phone permanently on silent mode. I also started charging my phone in the living room over night. This helped me to avoid those ‘30 minutes’ of phone time before going to bed and after waking up. I was able to massively cut down the amount of procrastination and fatigue that I experienced every day. As a result, I ended up having more time and energy for game development.

Getting Things Done by David Allen is a book that focuses purely on productivity. It argues that people who feel sluggish and overwhelmed might have too many things on their mind. The book describes a system where you have to create and maintain a set of lists. These lists enable you to offload all the things you worry about onto paper. The things you have written down do not occupy your brain space anymore and you don’t have to waste your time thinking about doing your taxes over and over again. The book inspired me to write down all the raw ideas I come up with and all the raw feedback I’m getting for my game into a list – this is my ‘Inbox’. I review that list when I plan my next update and assign an action and a priority to it. Writing everything down helped me to finally implement ‘would have been nice’ features that I had in my mind for almost 2 years.

Show Your Work by Austin Kleon is actually the reason I started this blog. The book recommends you to detail your journey as a creator as a way to promote your work. People are interested in the process of making video games or are interested in what you can teach them. Some people might even want to collaborate with you. The book argues that creating your little space on the internet and sharing your work beyond the pure product connects you not only with potential customers but also with likeminded people. Great artistic endeavors do not originate in a vacuum, but are usually the product of a network of artists.

These are some of the books I have read in the last six months. Hope that helps.
How to Find a Voice Actor on An Indie Game Budget

I’m currently working on my very own indie game where I had to find 4 voice actors. I’ve heard a bit about Fiverr but did not have any previous knowledge on how to actually hire and direct talent. Fiverr is where I started my journey and I came to believe that Fiverr is actually a decent place to start looking for people.
If you are working on a cutscene and need to work on the pacing and mood of your scene, you can hire somebody for 5$-$10 to read around 100 words. You won’t be able to use the recordings in the game though as licensing is not included and usually an extra $40 in that price range.

Having a real person read your lines helps you tremendously to further determine what you want and don’t want from a voice actor. I found 2 of the 4 final voice actors in my game on Fiverr. It’s really a random hit or miss on this platform as the ratings and price do not really reflect the quality you can expect. I had people for $50-$100 sound bored and asleep while people for $20 really sold their lines. I am hesitant to give out bad ratings on Fiverr as I don’t want to be responsible for ruining somebody’s livelihood or even burn an industry contact – we all have a bad day after all. I believe many of my game development colleagues feel the same. The selection of voice actors is a little bit limited. I looked for an English-speaking voice actor with a Latin American accent for my character Pablo Escobeer and I did not find a lot of options.

The thevoicerealm.com is another website I checked out to find a quality voice actor for my game. The selection of voice actors seems bigger. You can submit your lines on the website along with some direction and a couple of voice actor will read your lines for free. The quality of voice actors varied a bit with some of them being truly amazing. That talent comes with a price. The license for using that voice in a video game is $115 for 100 words. This sounds like a good deal, until you realize that this does not even allow you the creation of a YouTube video featuring your gameplay footage. That license is $200, which feels like quite a lot for an indie game budget. The restrictive licensing and the forced indirect communication with the talent caused me to refrain from hiring somebody from thevoicerealm.com.

Another option I can highly recommend is social media. I found a really talented voice actor here on Reddit and another one over at Twitter with the handle @VACastingRT. Tweet your voice acting requirements mentioning @VACastingRT and find your inbox full of voice actors wanting to audition. The price ranges here from $20 – $250 as you encounter voice acting enthusiasts and seasoned professionals.

I found working with voice actors to be really fun. Just be friendly and communicate your expectations clearly. Don’t leave them on read if you have trouble deciding which one to hire or if you have already decided to hire somebody else. There is always another project and another opportunity to work together, so be as respectful as you can be.

Quick shoutout to @lalaboowelsh, @Isaakwells, @TonyrayVA and @StevenPFortune for helping me with their amazing voices!

You can check out their work in Run For Cover!

© 2024 Schifty's Blog

Theme by Anders NorenUp ↑